طراحی لوگوی 3D
دوستان عزیز باید بدونید در کورل مابه دنبال ایجاد توهم دیداری هستیم یعنی نمایش اشکال سه بعدیبا استفاده از آبجکت های دو بعدی..
+ نوشته شده در سه شنبه سی و یکم اردیبهشت ۱۳۹۸ ساعت 20:24 توسط مربی
|
دوستان عزیز باید بدونید در کورل مابه دنبال ایجاد توهم دیداری هستیم یعنی نمایش اشکال سه بعدیبا استفاده از آبجکت های دو بعدی..
طراحی لوگوی شرکت نفت ایران برای آقایان

کتاب برنامه نویسی اندروید کتاب درس برنامه نویسیمون خواهد بود آقایان دانلود کنند.
آقایان از کتاب آموزش کورل کتاب اصلی درسمون فصول 4 ،5 و 6 را مطالعه نمایند تمرینات هر فصل را حل کرده تا روز شنبه تحویل نماینده دهیید.
موفق باشید![]()
Drawing eyes can be troublesome sometimes, but with a few vector tricks you can make a nice looking eye in no time. In this tutorial you will learn how to make a vector based eye using CorelDraw.
In this tutorial I'm using CorelDraw X4.
OK, let's get started!
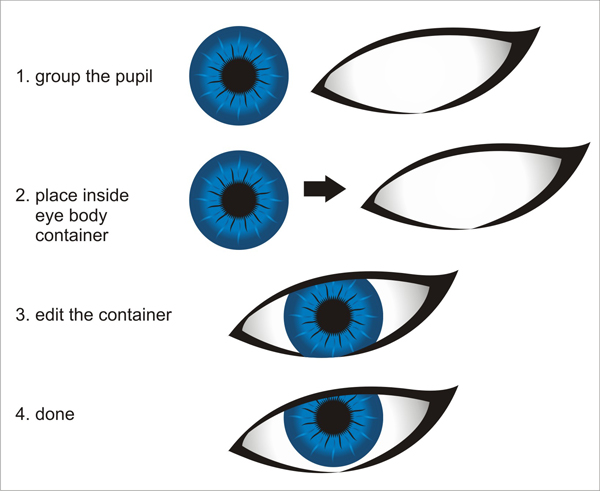
I will explain the basic elements and the steps to create a vector based eye.

Now that you know the steps and elements, we will begin step 1, which is creating the eye body.
Left click the start and end of the lines there will be two dotted arrow, left click and drag them in order to shape the line.
Repeat with the second line, and shape it like in the picture

Advertisement
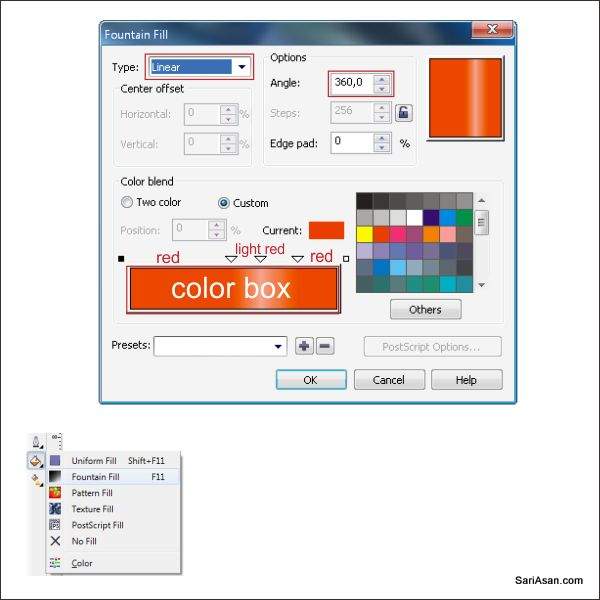
Now we are going to colorize the body of the eye. Go to the "Fountain Fill Tool" which is in the left bottom toolbar or just press F11.
Set the color like in the picture below,
to create a custom color double click the color box, and select others in the bottom color palette
and press OK.

Click the eye body with the "Pick Tool",
to remove the line in the eye body go to the right color panel, you will see the first color box is X spotted, right click it,
if you've done this correctly it will look like the image below.

Now we will create the eyeliner.
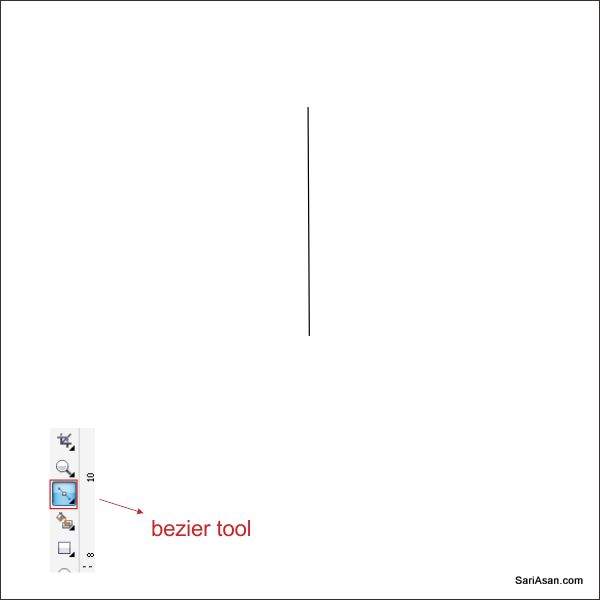
Draw a shape by using the "Bezier Tool", create a shape like in
the picture below, make sure that the last click is connect with the first click or else you
cannot colorize the shape.
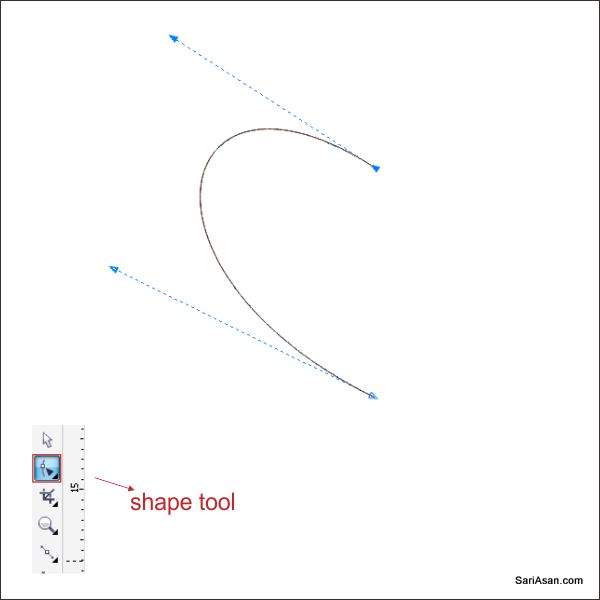
Shape the eyeliner by using the "Shape Tool", right click in between the two nodes or corners and find "convert to curves tool" at the top corner and click it.
After that you will see two dotted arrows, click and drag them to shape it, apply this to all the
lines until you make a shape like in the picture.

Now that you have the upper and bottom eye liner, we need to make a corner eye liner
just to make it more realistic

Now that we have the eye body and the eye liner, it's time to put it together to form an eye

We will now work on the pupil.

Colorize the big circle,
select the big circle with the "Pick Tool",
go to the "Fountain Fill Tool" (it's in the left bottom toolbar or press F11).
Set the fill type to radial, set the color in the left and middle left to custom color or others with the value of C 96 M 73 Y 35 K 4 and set the color in the right and middle right to Sky Blue.

Now, add a texture to the big circle
- after that hold "Left Click + Right Click + Control" together drag and rotate them clockwise
then release the buttons
- now you see that the shape is duplicated, but you need to duplicate them again by
pressing "Control + D" until you have a shape like in the picture below.

Now let's colorize the shape.
Left Click the shape with the "Pick Tool",
go to the "Fountain Fill Tool" (its in the left bottom toolbar or press F11).
Set the fill type to Radial and set the Color in the left to a custom color or others with the value of "C 96 M 73 Y 35 K 4"
and Set the color in the right to Cyan.

Select the shape by click using the "Pick Tool"

Put the pupil into the eye body
Now, make a reflection on the pupil
set the value to 50

If you have followed the steps correctly, it should look like the image below.

Now we are going to make the eye lashes
below, don't forget to select and press "Control + Q" in order to make them editable
duplicate it by holding "Left click + Right click"

We are now done, you have created a vector based eye with CorelDraw! You can customize the eye by adding more eyelashes, shadow or texture in the pupils. I hope you've enjoyed this tut!


سلام به دوستان عزیز
دوستان عزیز فایل هایی رو که براتون میزارم از اینجا بردارید لطفا
3: آموزش
4: فیلمهای آموزشی 1
5: فیلم های آموزشی 2
سایتهای مرتبط با درس:
_________________________________________________________________________
تمرین هاتون رو از این به بعد اینجا میتونید ببینید و انجام بدید
Step 1 : Basic Elements
First of all you have to use CorelDraw with version 11+. In this tutorial I use CorelDraw X5. Let's get started!
First take a look at the basic elements used to create our design :
![]()
Now that you know the steps and elements, we will begin.
First of all open your CorelDraw program. Now create a new file and set the paper size to A4 with a landscape view.
![]()
Now that we have our worksheet set, now we will begin to create the Floral Shape, using the "Bezier Tool".
Draw a shape by using the "Bezier Tool", point & left click to create a thin triangle shape like in the picture below.
![]()
Tip : Make sure that the last click is connected with the first click or else you
cannot put color on the shape.
Shape the triangle by using the "Shape Tool", It’s the second upper left toolbar.
Left click in the triangle using " Shape Tool " and find "convert to curves tool" at the top corner and click it.
![]()
After that you will see two dotted arrows, click and drag in order to shape it, apply this to all the lines until you make a shape like in the picture.
![]()
![]()
Left click and drag the bottom line in the shape using " Shape Tool ", to create a new node and shape it using " convert to curves ", to make it more natural.
![]()
![]()
Now let’s put color so it will look more natural.
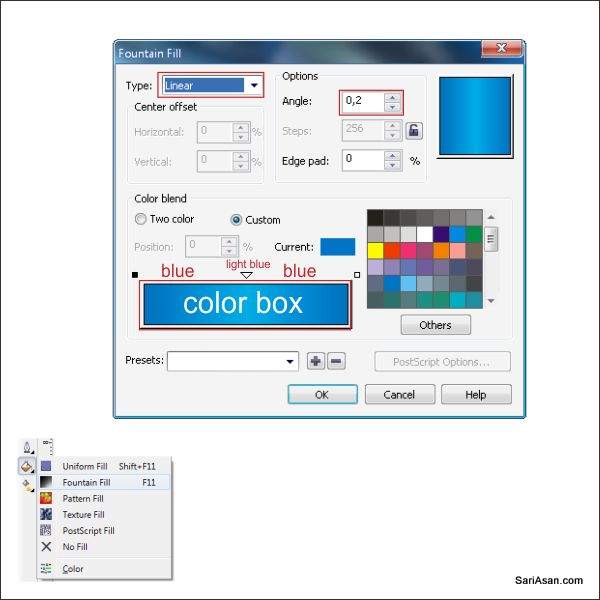
Select the Floral Shape. Go to the Fountain Fill Tool, which is in the left bottom toolbar.
Choose Custom fill on the color blend and make the type Linear.
Now you will see a color box. You can change the color by left-clicking it,
fill the color with Light Blue on the left, Cyan on the middle and Dark Blue on the right.
You can make a custom fill by double-clicking at the color box.
Fill the color with Cyan on the middle left, and another Cyan on the middle right.
Two custom colors in the middle will make the color gradient softer.
Make the Gradient Angle to 27, actually you can change this as you please, but in this tutorial lets make it 27.
![]()
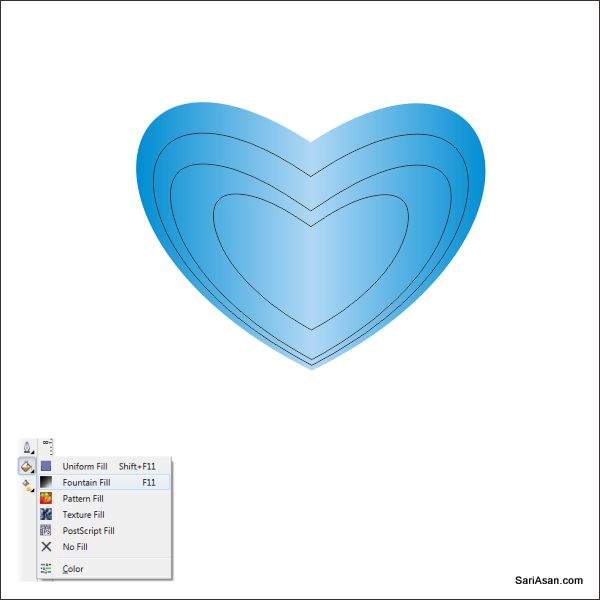
If you do it right it will look like this
![]()
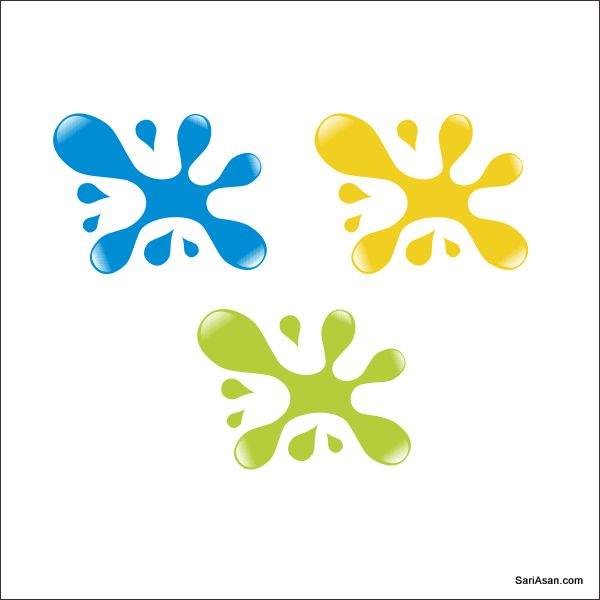
Now using the same steps as above, create another 3 Floral shape in different colors.
Try using Pink / Purple, Green & Yellow color variations, but you can choose any color that you like.
![]()
Tip : More custom colors in the middle will make the color gradient softer.
Try to play in the light to dark color scheme, it will look more natural.
Lets now begin to make the Floral Texture,
as now you know how to work with "Bezier Tool" & " Shape Tool " .
Create 5 thin Triangle with " Bezier Tool & Shape Tool " using the same way as Step 3 - 4.
![]()
Shape it using " Shape Tool" and put a Light Blue color in it.
![]()
Now that you have the Floral Texture, lets apply it into the Floral Shape.
But first we are going to make it a little transparent so it will blend nicely.
Go to Interactive Transparency Tools, it’s in the left bottom toolbar,
Left Click & Drag the Floral Texture, to the bottom, so the transparency will make it linear to bottom.
![]()
After that, we are going to insert the Floral Texture into the Floral Shape using " PowerClip"
Left-click the Floral Texture, and then go to the top toolbar and find Effect > Powerclip > Place Inside Container.
Then you will see a black arrow, Left-click it to the Floral Shape,
and now you will see that the Floral Texture is inside the Floral Shape. You can go "inside" or "outside" the container by holding Ctrl while double-clicking it.
![]()
Apply it on the other Floral Shape, using the same ways as step 6 - 7 .
![]()
Now that we have 4 Floral Shape, lets arrange them into the position.
Using "Pick Tool " click one of the Floral Shape and double Left click until you see a rotating arrow.
Left click and Drag, in order to rotate the shape.
![]()
Using the same way as above, arrange the other Floral Shape into the position like below.
![]()
Copy and duplicate it using " Ctrl + C" and " Ctrl+ V", to make it more dense.
![]()
We are going to make the Bubbles,
Using the " Ellipse Tool " Left click and drag to create a circle, find it on the left toolbar.
![]()
Copy or duplicate the circle using " Ctrl+C " & " Ctrl+V", resize and arrange them like in the picture below.
![]()
Put a White Color on the Circle, and put the circle on top of the Floral Shape.
![]()
Now we are going to make the Bubbles Transparent, so it will look like a water drops.
Go to Interactive Transparency Tools,
in the Interactive Transparency Tools go to the upper left toolbar.
There you will see a transparency type, set it to Radial.
![]()
If you are doing it right it will looks like this
![]()
We are going to create the sparkle to make the bubbles shiny.
Go to the Banner Shape Tool, after that go to the Top toolbar,
there we can choose the shape that we are looking for.
Choose the last shape in the toolbar, which is the exploding shape.
![]()
Put a white color in it, and arrange it into the Bubbles.
![]()
And we are done, you can make it more interesting by adding background or text like the final image below
![]()
Learn here how to create a this bird using a few techniques in Corel Draw. Successful completion of this tutorial requires an intermediate knowledge of Corel Draw. We think it's easy as there is no need for Art school sketches that are usually needed in the first step. Let’s get started!
Below is the final image we will be working towards. Want access to the full Vector Source files and downloadable copies of every tutorial, including this one? Join Vector Plus for just 9$ a month.

Create new document, whatever size. A4 is fine. Draw the shape of the bird's body using the Free Hand Tool and make it nice with the Shape Tool. This part requires a bit of creativity :)

Advertisement
Color the shape blue. Then Copy the shape and paste in the same place. Now using the Up Arrow key, move the second shape 4 pixels up. And then change the color of the second shape to a lighter blue. For better a effect use the Radial Gradient Fill Tool with a lighter to darker blue. Still the first shape should be darker to get that dark line at the bottom.

Copy the shape and place it in the white area. Copy it again and paste it. Then make it a bit larger and put it over the smaller one (green on pink example). Using the Back Minus Front option Cut the shape off. Then change it to blue (or use the gradient that we did in last step). And place it on our main shape.

Do the same again but cut a smaller, thiner part. Those steps are needed to add some light effects, which make it more 3D.

This step uses only one simple option: Intersect (marked by red box, shown below). Just as in the steps above, select two object and Intersect. You will get the shape that both object share.
This technique is an easy way to get shapes that you want in many other situations. In the picture below, notice that we used circles on the main shape, then the eye, then the eyeball, etc. Be sure to apply a radial fill to the eye as shown above.

Do the same thing again. This time create the bottom part of the bird (that's the way birds are built, a white patch makes the bird look more real).

Coming back to using the Back Minus Front option. Cut off the shape of the first eyelash. Than copy, paste, resize, and rotate to put them together. Now copy the whole thing and paste in place, change to a darker blue, rotate a bit, and move it to the back. Lastly, group it and place it on the bird.

To draw the legs and nose you need to use the Free Hand Tool and make it nice with the Shape Tool. In this step, we want to show you how using the same color, but in different brightness, adds more depth and dimensionality.

This must be the easiest step because you do do not have to be exact. Just draw away and create some jagged shapes for the eye. The more uneven the better.

Now let's make the wings. In the image below, you can see again how we cut the shape out of the circle using different circles. Then we rounded the corners a bit using the Shape Tool. Also, we added some light effect, just like in Step 4.
Place the wing on the bird. Also, Copy and Paste In Place the same wing, but change color to gray, move to the back, and move to the left a bit. That gives the effect of the second wing on the other side of the bird (you can see tiny gray part near the legs).

We're almost done. The hat is a simple thing drawn using the Freehand Tool to create the shapes shown below. They each were given different brightness, fills, and a radial gradients was placed on the white stripe to add 3D.

Place the hat on the bird. Add a dark blue ellipse under the hat (some kind of shadow of the hat). And our Quirky looking twitter bird in vectors is done!

Start by drawing an open sided oval in the center of your page. Draw the oval as if the upper right quarter has been erased.

Draw a smaller arc within the open oval, with its ends meeting the left and bottom sides of the oval.

Use three overlapping arcs to form the first petals. These should form a shape similar to a lumpy circle.

Now, begin using swooping, curved lines to craft more petals. The smaller should attach to the upper right of your drawing. The larger will attach to the first curve, enveloping the bottom left of your drawing.
OTHER EASY DRAWING GUIDES:


As you continue to add curved petal lines, note how you can create a “fold” detail in the petal by allowing one line to extend into the center of the petal.

Draw another curved line petal enveloping the bottom left side of the drawing. Note how each petal is slightly larger than the last.

Use curved lines to draw another petal on the upper right hand side. Again, let the upper line extend to form a petal fold.

Use one curved line to form a smaller petal on the bottom left.

Use one curved line to form a petal on the bottom right.

Use one curved line to form a petal on the upper right.

Use one curved line to form a petal on the bottom right.

Use one curved line to fill in the gap in the upper left of the flower with another petal.
OTHER EASY DRAWING GUIDES:


Now, add some detail. Place a small curved line within each of the outer five petals, radiating from the center of the flower, two-thirds of the way to the edge of the petal. These lines give the drawing depth.

Continue to add detail to the inner petals. Allow one or two curved lines to radiate from the flower’s center towards the petal edge.

Use two lines to form a curved triangle shape at the upper left corner of the flower. Use two more lines to form a triangular leaflet, slightly overlapping the first.

Draw more leaflets on three more sides of the flower. Opposite the first two leaflets, draw two more.

Between the leaflets, you will outline the leaves. Start with an arcing line for one side of the leaf. Draw a loose S-curve to form the other side of the leaf. Draw three leaves in this way, evenly spaced around the flower.

To draw a central vein in each leaf, begin a curving line at the leaf tip and connect it to the petal at the leaf’s center.

Add veins to the leaves. In each leaf half, draw three to seven straight lines radiating from the central vein to the edge of the leaf.

Finish your drawing by erasing any stray marks and coloring your flower.
Roses are often referred to as the symbol of romance and love. They are beautiful and breathtaking to look at. If you don't have a green thumb, you can still create a rose on paper.

Method1
Full Bloom Rose

1
Draw a small freehand circle in the center of the page for the center of the rose.

2
Add another irregular oval shape at a diagonal base of the above circle for the first petal.

3
Join a curved line from the small circle to the oval shape for the second petal.

4
Complete the first set of petals around the centre by joining yet another curved line to the above.

5
Begin drawing the first spiral around the earlier made for the second row of petals.

6
Engulf the earlier row of petals by a bigger outer irregular curve for the third row of petals.

7
Join further outer petals of the rose with wavy lines joining at appropriate places.

8
Draw the extreme outer petal of the rose.

9
Detail the rose further with petals and leaves.
10
Color the rose red with green leaves adding appropriate shades to it.
Method2
Rose Motif

1
For those who cannot get their hands to do the wonders of making the first rose (myself included), try this instead! Draw a small spiral in the centre of the page.

2
Extend a petal on one side of the spiral.

3
Add another petal to the opposite side of the spiral.

4
Draw the third petal at the bottom of the spiral joining the above petal shapes.

5
Add a small detail in the centre of the spiral of the rose.

6
Create a leaf each on either side of the flower with a small midrib each.

7
Color the rose with variations of red and green for the leaves.
Method3
A Rose with Stem

1
Draw a vertical curve in the centre of the page for the guide to the stem of the rose .

2
Add thorny details on the left side to the above made curved line.

3
Add details also on the right side of the curved line.

4
Draw a leaf extending on the top left side of the thorny curve.

5
Add couple of more leaves on either side of the thorny stem.

6
Add details to the leaves by drawing the midrib and a few veins.

7
Start making the flower from its base by drawing the sepals.

8
Go ahead with drawing the flower petals from the centre and adding one petal to its right.

9
Add further petals of the rose heading upwards to the centre.

10
Draw the centre details of the rose petals.

11
Detail the leaves with edgy outer blades.

12
Erase all unnecessary guides and color the rose and the leaves.

13
Enrich the painting by applying appropriate shades and a shadow
By using Corel Draw you can draw any type of flowers very easily, here in this tutorials, I will disclose very simple way how to make lines flowers within few steps. This is basic Corel Draw tutorial, Just follow below simple steps.
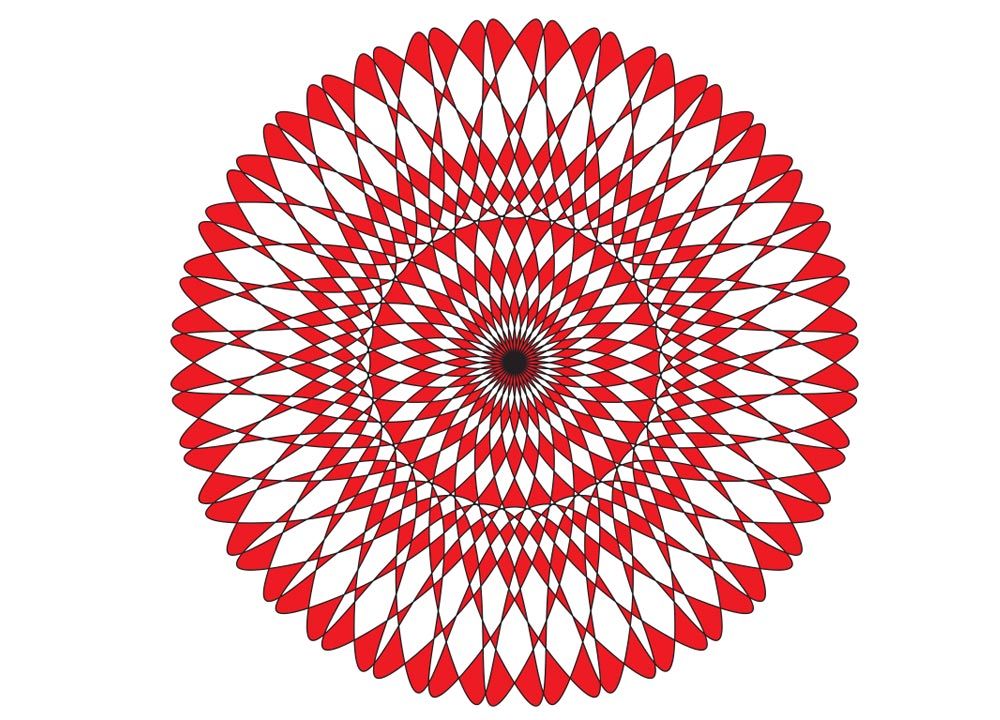
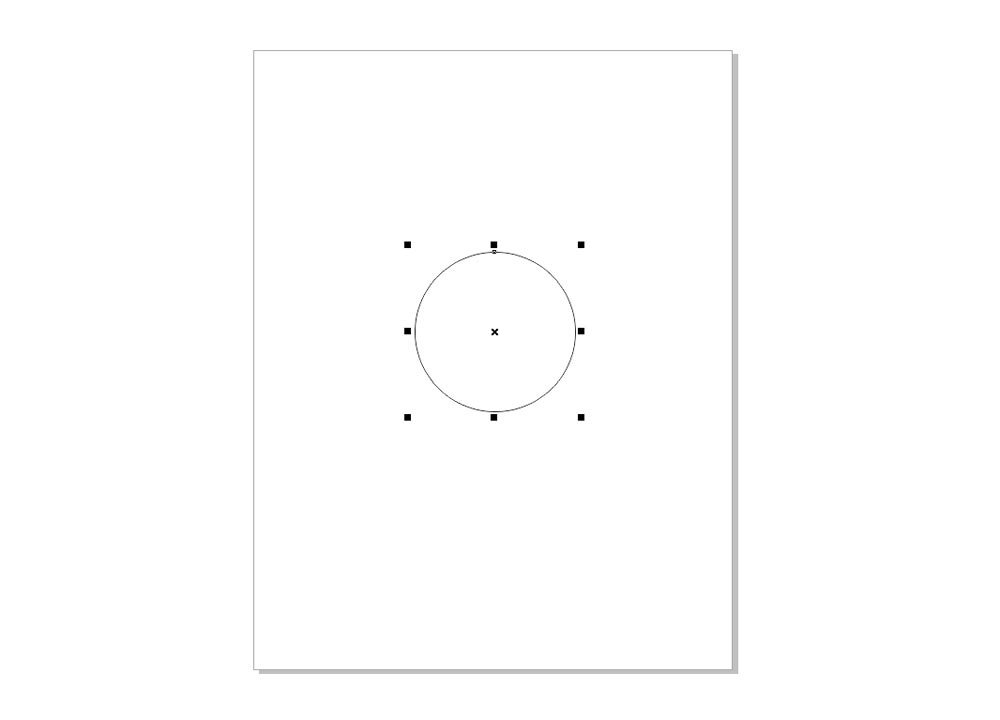
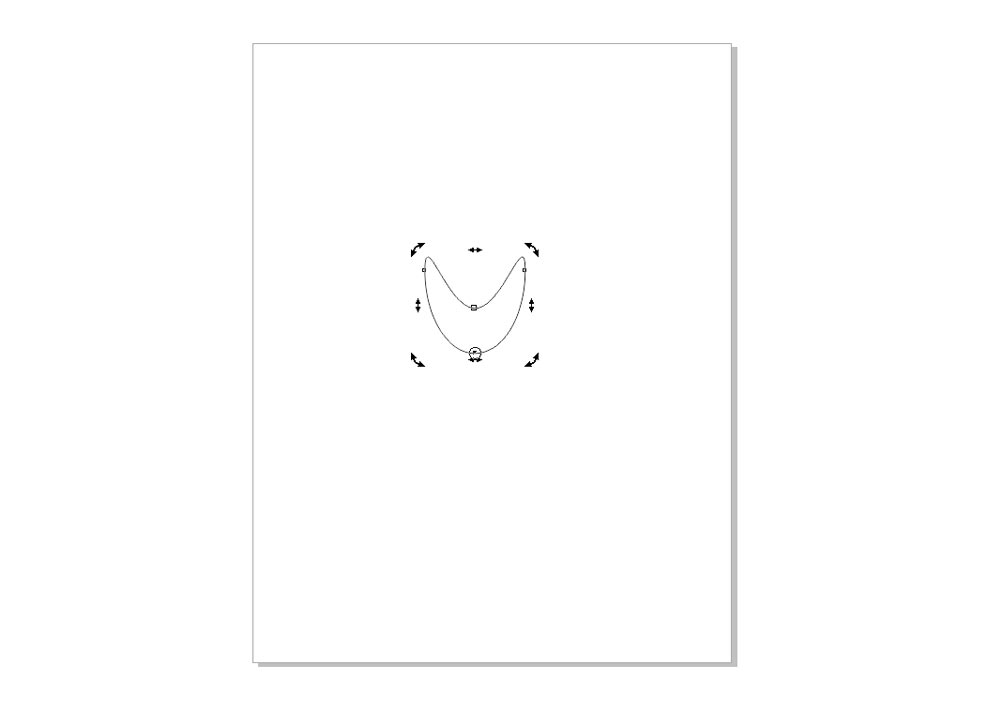
1 Open Corel Draw and create simple petal shape for making flower, actually this petal shape works great here, let’s see that fun how does it works. Take ellipse tool (F7 is the Shortcut Command) and draw small circle as shown the below image, and after press Ctrl+Q, it’s curve the ellipse and allows to edit as we like, just now change the curve line something shown below steps images.
2 Now Double click on the shape to show the rotation selection and drag the center of the shape at the bottom.
3 Now go to Arrange> Transformation>Rotate,
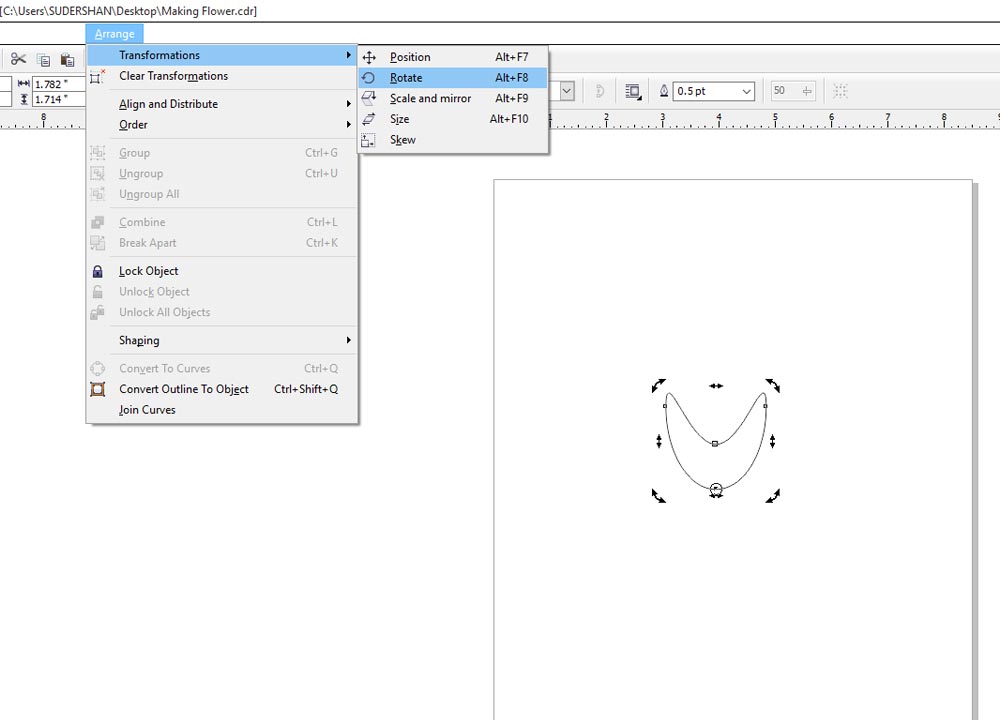
here select rotate tab, keep the angle value 10 which is divide 360 degree rotation. Now click apply to duplicate and then you can see after clicking it will duplicate at 10 degree angle, after your image seem to be as shown the below images.

make sure its duplicated complete rotation or not, once you feel better then go ahead to selecting all.
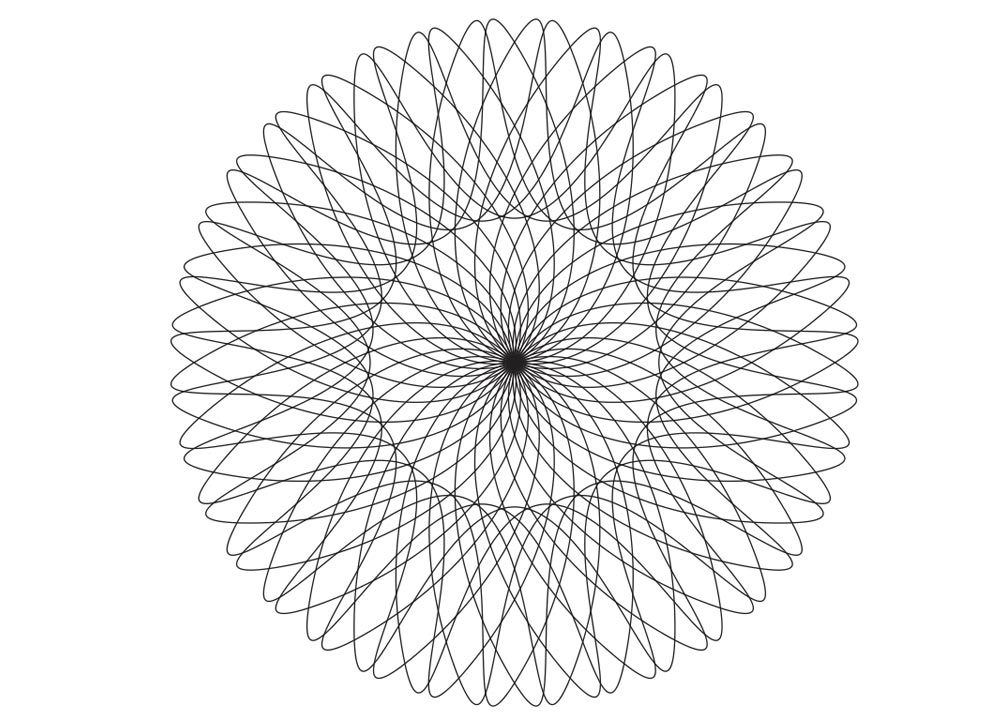
4 Now select all petals and fill any of your favorite color and then go to menu bar >Arrange> Combine then you will get probably as shown below image.
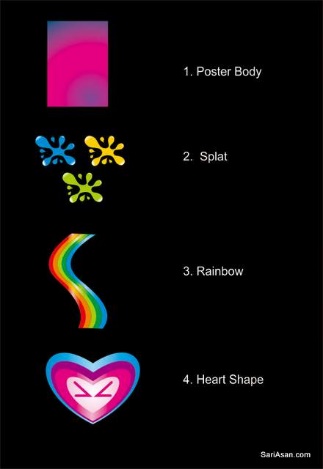
در ابتدا شما باید از CorelDraw با نسخه ۱۱+ استفاده کنید. در این آموزش از CorelDraw X5 استفاده می کنم. بیایید نگاهی به عناصر اساسی مورد استفاده برای طراحی بیندازیم:
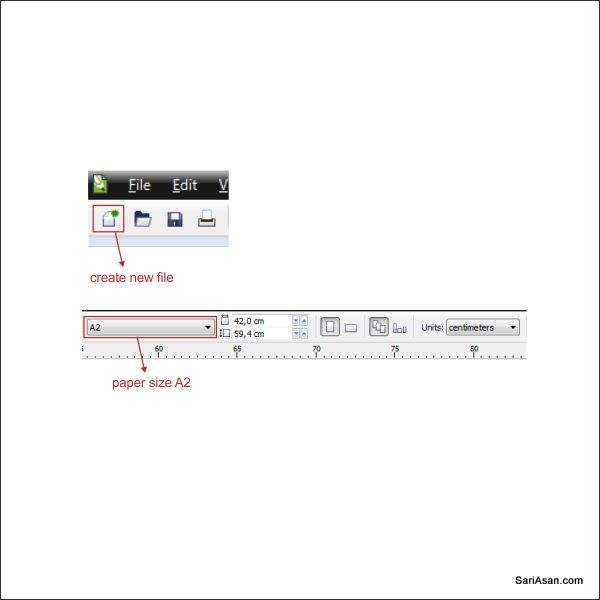
خوب، حالا که مراحل و عناصر را می دانید، شروع می کنیم. ابتدا برنامه CorelDraw را باز کنید. حالا یک فایل جدید ایجاد کنید و اندازه کاغذ را به A2 که اندازه ی استاندارد برای پوسترهاست تنظیم کنید.
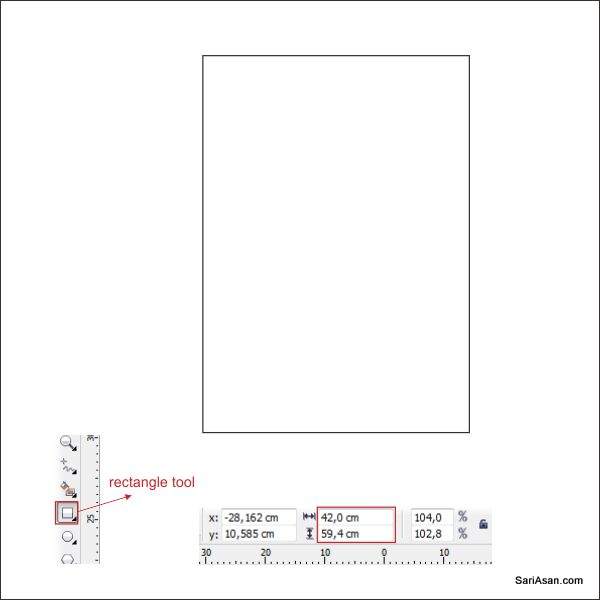
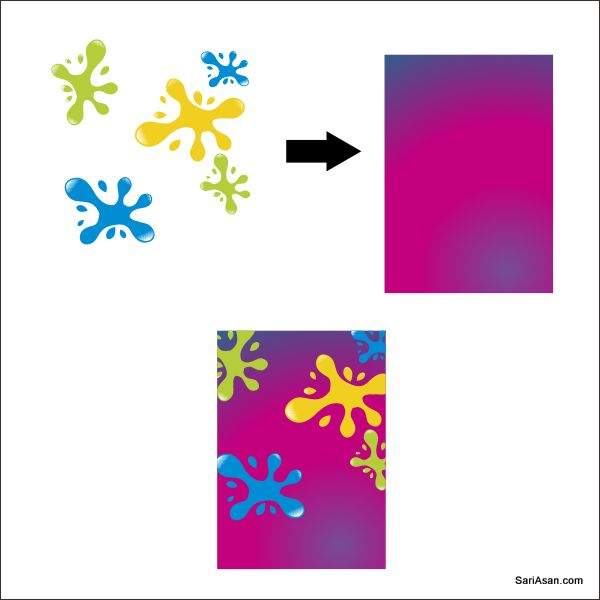
حالا که برگه کار خود را تنظیم کرده ایم. شروع به ایجاد بدنه اصلی پوستر می کنیم. به «ابزار Rectangle» بروید، می توانید آن را در نوار ابزارسمت چپ پیدا کنبد.شکل جعبه ای درست کنید و سپس آن به همان اندازه از برگه ,تغییر اندازه دهید(۴۲ x 59.4 سانتی متر)
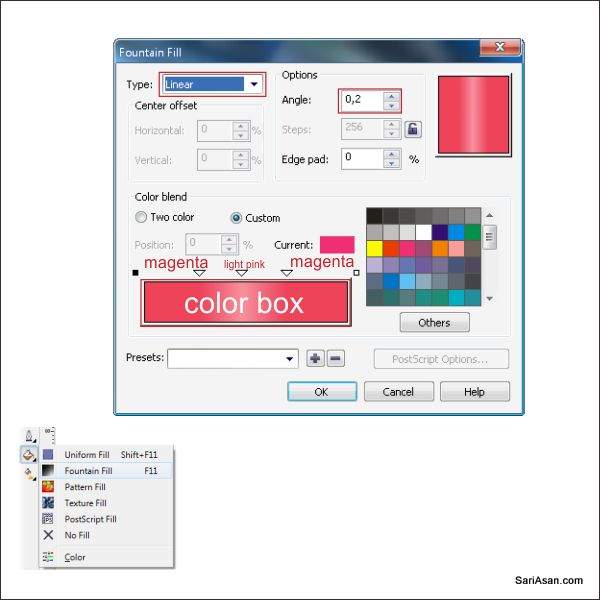
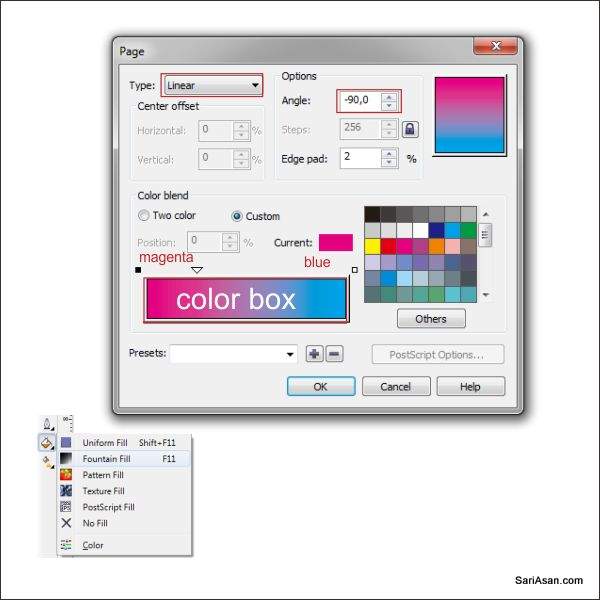
حالا آن را رنگ کنید. جعبه را انتخاب کنید.حالا به ابزار Fountain Fill بروید، که در نوار ابزار پایین سمت چپ قرار دارد. رنگ سفارشی را در ترکیب رنگها انتخاب کنید و Radial Type را انتخاب کنید. حالا یک کادر رنگی خواهید دید شما می توانید رنگ را با کلیک چپ بر روی آن تغییر دهید. سمت چپ را آبی کنید، رنگ صورتی در وسط و سمت راست را بنفش کنید.
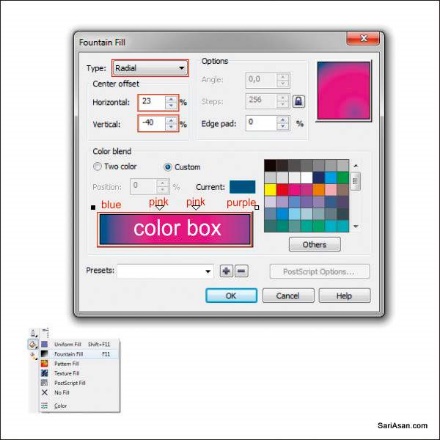
مرکز افست را به مقدار افقی ۲۳ و عمودی ۴۰ تنظیم کنید.
نکته! نحوه ایمپورت کردن فایل های Adobe Illustrator و PDF در نرم افزار CorelDRAW
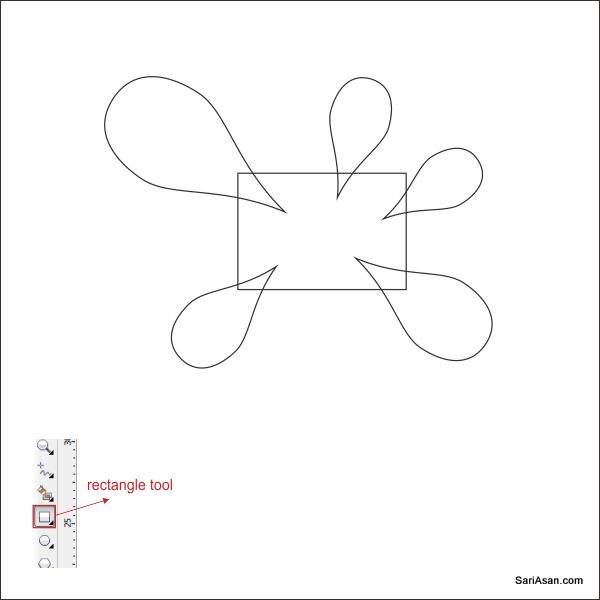
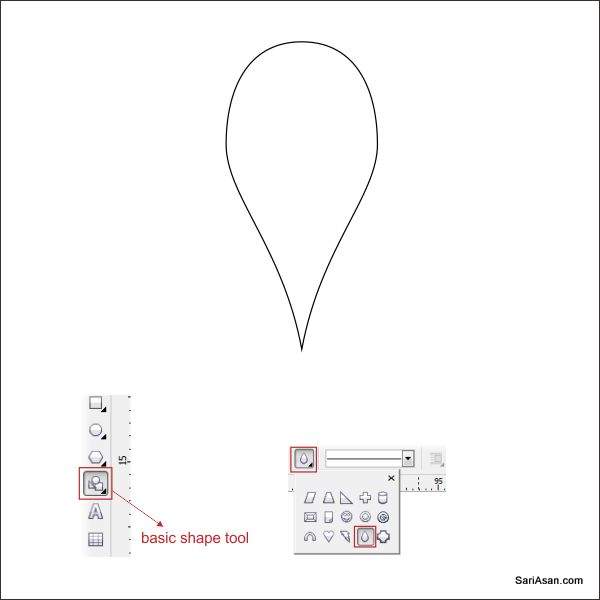
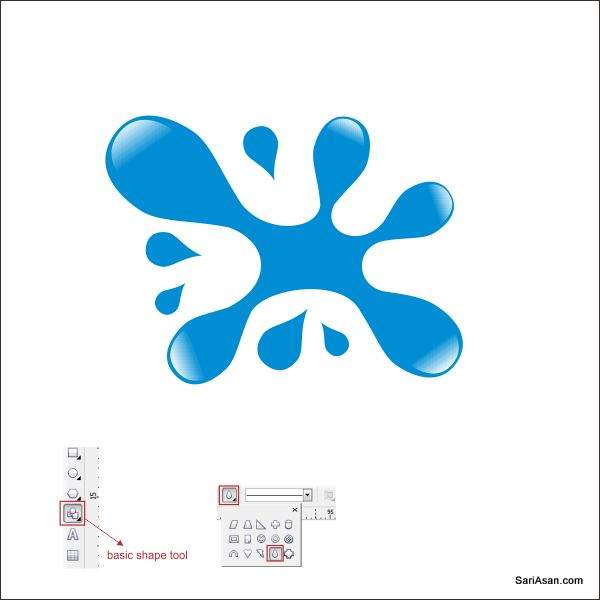
ما قصد داریم یک علامت رنگی(Splat) ایجاد کنیم، با استفاده از ابزار Basic Shape Tool به “Basic Shape Tool” ، در نوار ابزار سمت چپ بروید ، پس از کلیک بر روی آن به نوار ابزار بالا بروید. در آنجا شما گزینه drop box را مشاهده خواهید کرد، یک قطره آب طراحی کنید که دومین شکل از آخر میباشد.
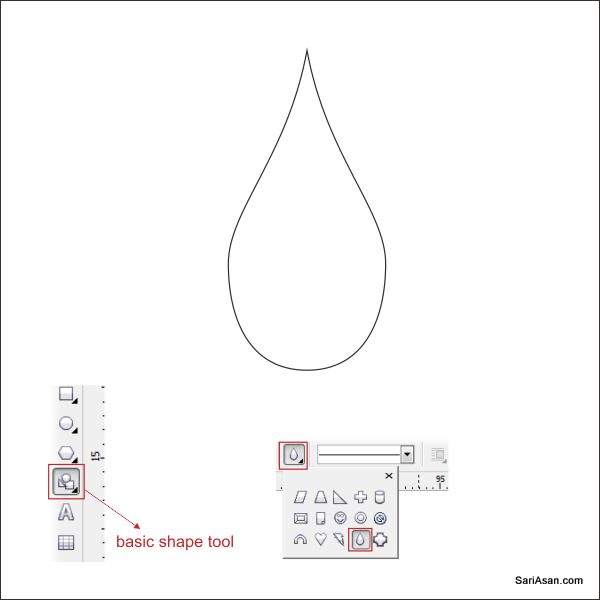
با کلیک یک قطره اب ایجاد کنید و آن را بکشید. کپی کنید واندازه آن را تغییر دهید( با استفاده از Ctrl + C برای کپی و .Ctrl + V برای چسباندن). مانند شکل زیر آن را تنظیم کنید.
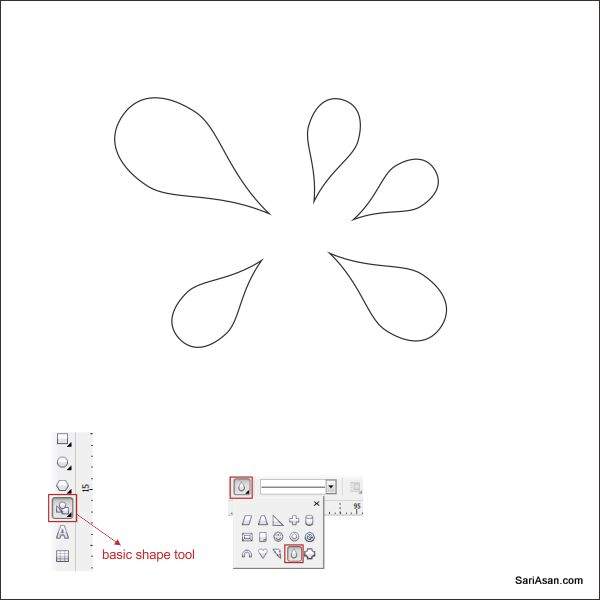
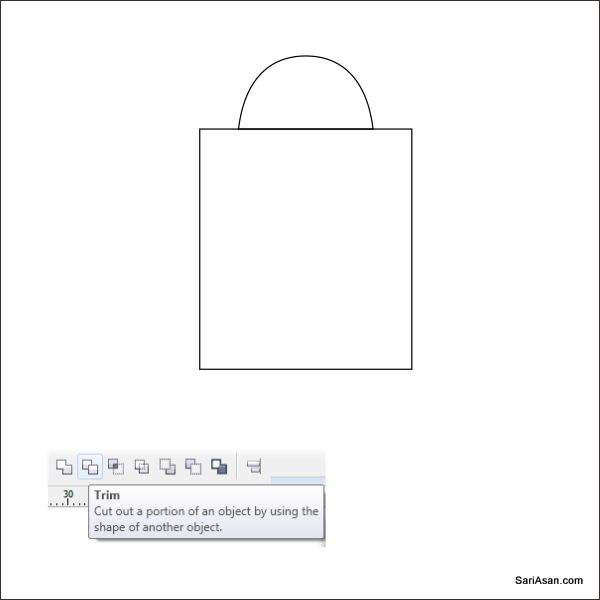
حالا با استفاده از ابزار Rectangle یک شکل جعبه ایی ایجاد کنید. به «ابزار مستطیل» بروید، می توانید آن را در نوار ابزارسمت چپ پیدا کنید. شکل جعبه را ایجاد کنید و سپس آن را در مرکز Splat قرار دهید. بعد از انتخاب splat و جعبه به toolbar در قسمت بالا بروید.
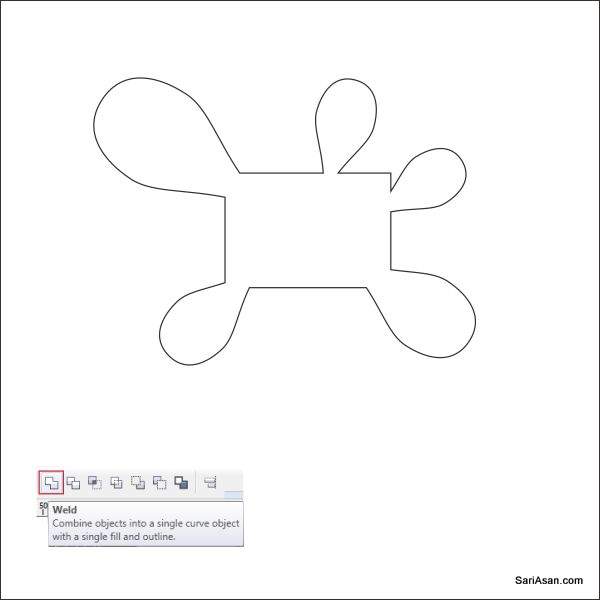
در اینجا شما “پیوستن، برش، تقسیم ابزار”را میبینید، ابزار پیوستن برای پیوستن, آن را فشار دهید. حالا باید آن را شکل دهیم ، تا طبیعی تر باشد.
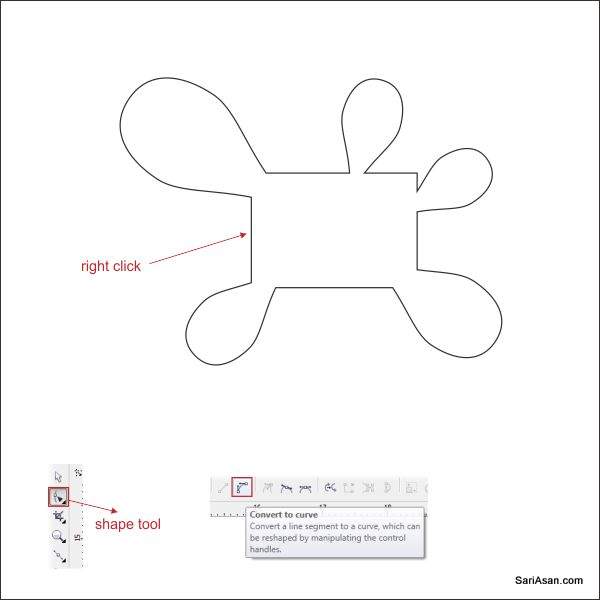
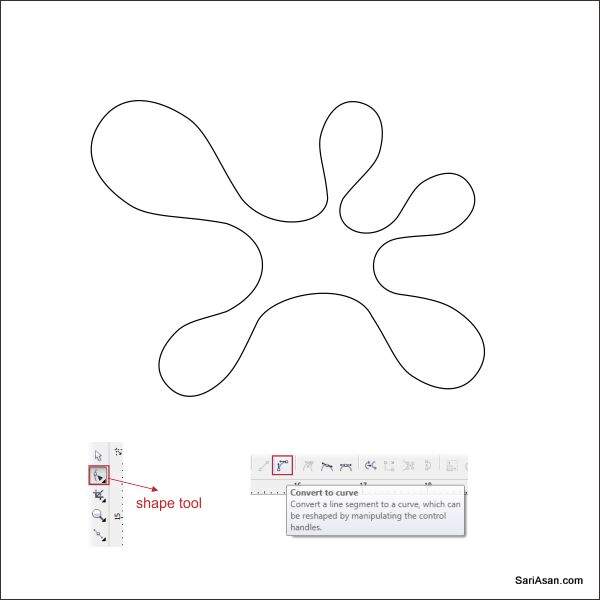
به « Shape Tool » بروید و روی خطوطمیانی در قسمت چپ یعنی « Shape Tool »کلیک کنید و ” convert to curves tool ” در گوشه بالا, را پیدا کرده بروی آن کلیک کنید.
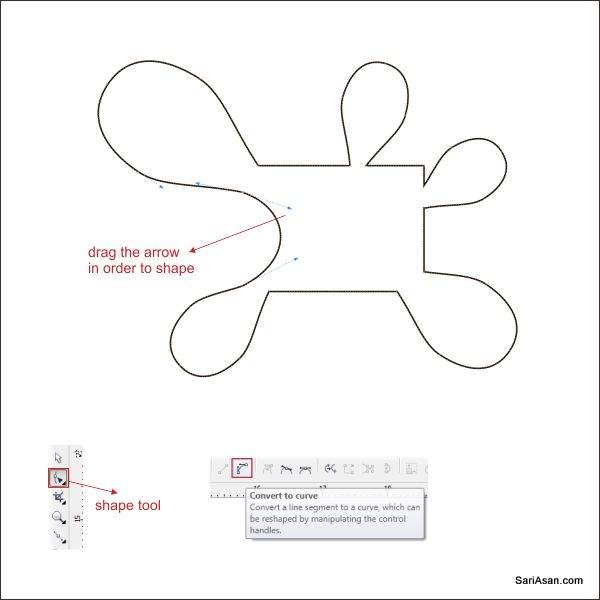
بعد از آن دو فلش خالی را خواهید دید، روی آن کلیک کنید و بکشید تا شکل در آن ایجاد شود. این را به تمامی خطوط اعمال کنید. تا شبیه تصویر زیر شود.
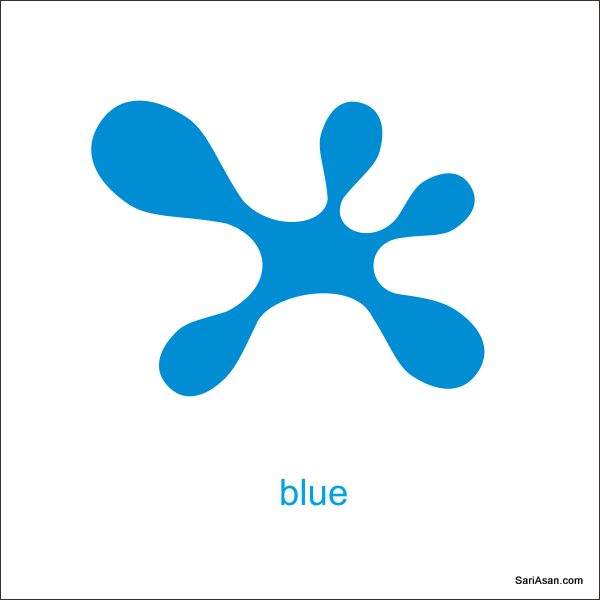
آن را آبی رنگ کنید
با استفاده از “Ctrl + C” برای کپی کردن و “Ctrl + V” برای چسباندن، آن را به سه شکل تبدیل کنید.
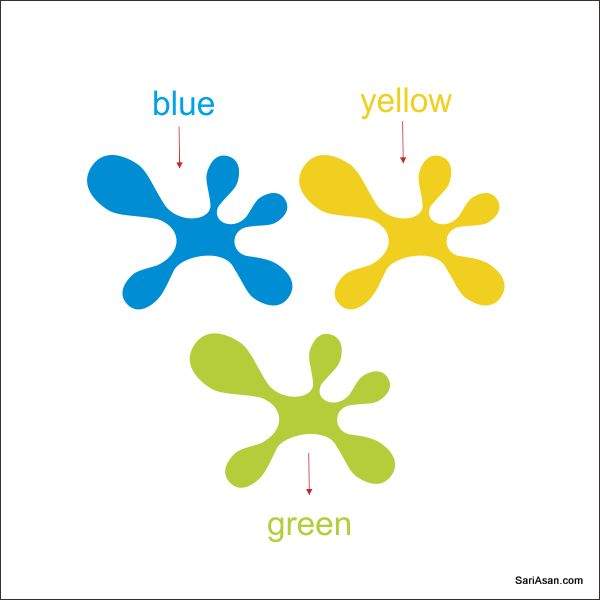
۲ عدد (splat)را به رنگ زرد و سبز پر کنید.
حالا با استفاده از ابزار « Interactive Transparency Tools »، یک اثر برجسته را روی (splat) ایجاد کنید. اول از همه شکل یک ((water dropرا با استفاده از ابزار (Basic Shape) مانند مرحله ۴ ایجاد کنید
یک جعبه با استفاده از ابزار (Rectangle) در بالای water drop))ایجاد کنید.

حالا ما قصد داریم آنرا برش بدهیم،هر دو شکل را انتخاب کرده وبه سمت بالا ببریم. در اینجا شما ابزار جوش،برش،ابزار تقسیم را مشاهده میکنید.ابزار Trim را فشار دهید تا آن را برش دهید. جعبه را حذف کنید دیگر نیاز به آن نداریم.
آن را سفید رنگ کنید من میخواهم یک پس زمینه آبی موقت برای آن بگذارم پس میتوانید آنرا ببندید. شکل را انتخاب کرده وبهtools transparency lnteractive بروید. آنرادر نوار ابزار پایین سمت چپ قرار دهید. کلیک کنید وشکل را به پایین بکشید.
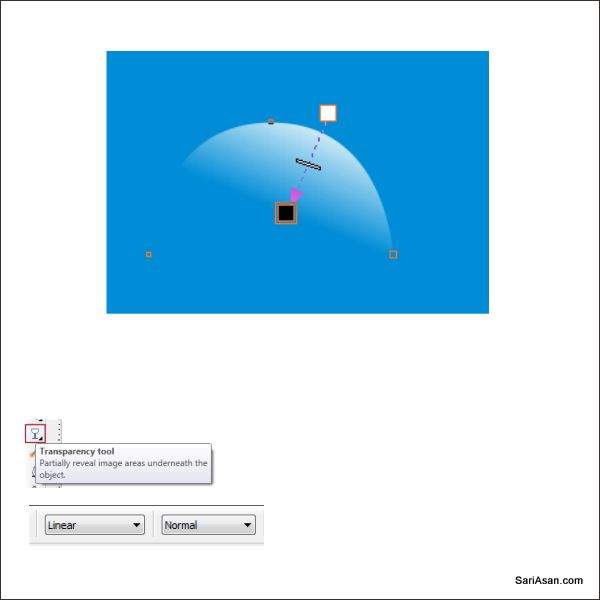
اکنون بعد ازاینکه ما آنرا شفاف ساختیم ،آنرا به بالا از splatترتیب دهید.
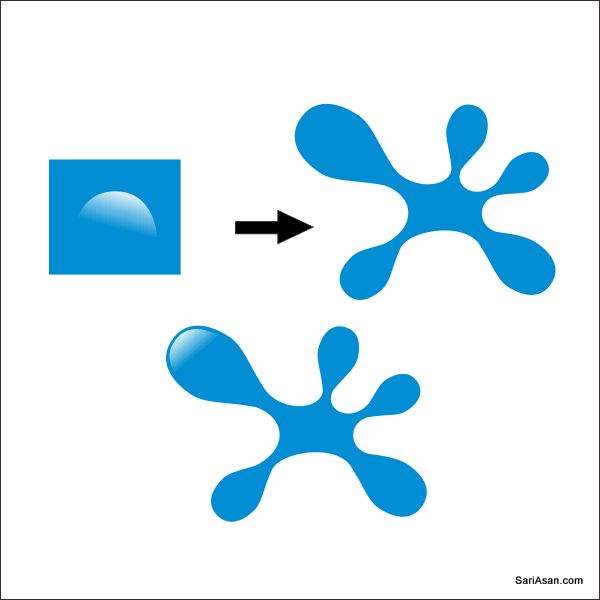
با کپی کردن شکل شفاف را به تمام قسمت های splatاعمال کنید.

با استفاده از ابزار شکل پایه همانند مرحله ۴یک قطره آب کوچک ایجاد کنید.آنرا در اطراف splatترتیب دهید تا طبیعی تر به نظر برسد.
گام بالا را به زردوسبز پر کنید.
حالا ما قصد داریم splatرا ترتیب دهیم.تکه تکه را در بالای posterتنظیم کنید،اندازه آنرا تغییر دهید و مانندتصویرزیر تنظیم کنید.
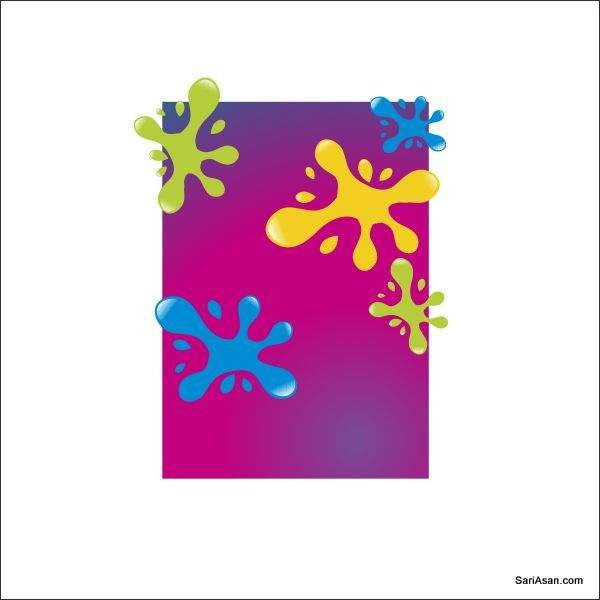
پس از آن ما با استفاده از power clip،splatرابه پوستر وارد میکنیم. روی all splat کلیک کنید وسپس به نوار ابزار بالا بروید وeffect power clip .place lnside containerراپیدا کنید.سپس یک فلش سیاه را می بینید،سمت چپ آنرا به شکل گل میبینید،اکنون خواهید دید که گل در داخل شکل گلدار است .با دوبار کلیک کردن بر روی cntrlمی توانید داخل یا خارج از ظرف قرار بگیرید.
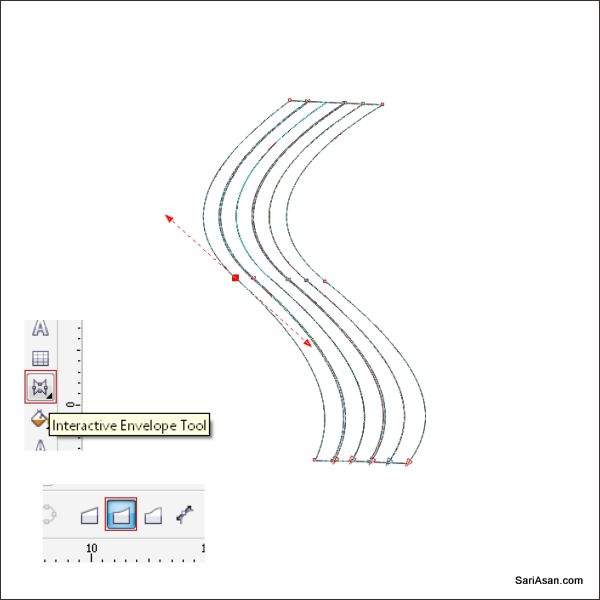
ما قصد داریم رنگین کمان را با استفاده از ابزار مستطیل ایجاد کنیم.به ابزار مستطیل بروید ،میتوانیدآن را در نوار ابزار چپ پیدا کنید،۵جعبه نازک را در بالای صفحه ایجاد کنید.۵جعبه نازک را انتخاب کنید وبه ابزار پاکت تعاملی بروید،در اینجا بدنه پوستر آماده است
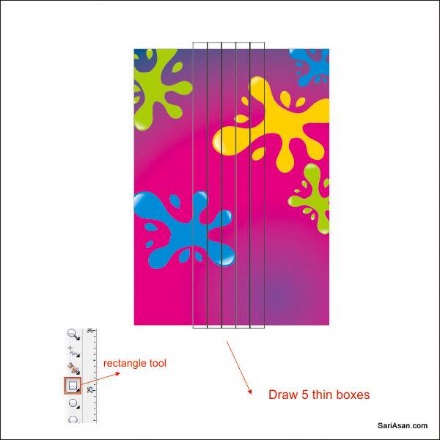
در ابزار envelope lnteractiveبه نوار ابزار بالا بروید ودکمه single arc modeرا فشار دهید،حالت منحنی برای شکل دادن این کار اعمال خواهد شد. شکل جعبه ها را با کلیک وپیکان شکل را مانند شکل زیر بکشید.
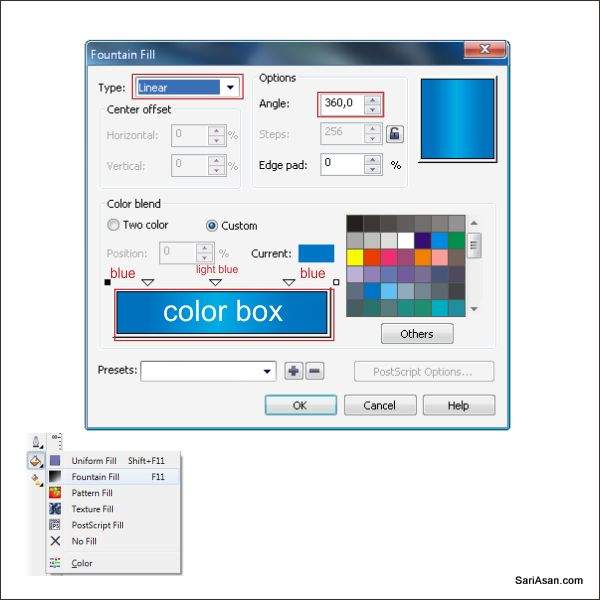
حالا که ما رنگین کمان داریم ،اجازه دارید رنگ در آن قرار دهید.اولین رنگین کمان را انتخاب کنید وبه ابزار fountain fill tool برویدومقدار زیر را اعمال کنید.
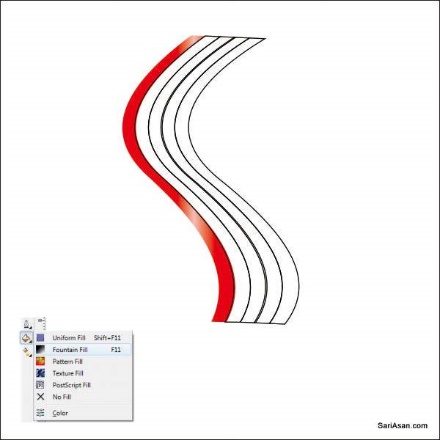
دومین رنگ رنگین کمان را انتخاب کنید به fountain fill toolبروید ومقدار زیر را اعمال کنید.

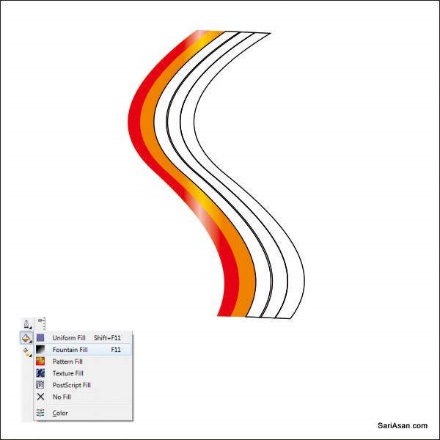
سومین رنگین کمان را انتخاب کنید،به fountain fill toolبرویدومقدار زیر را اعمال کنید.
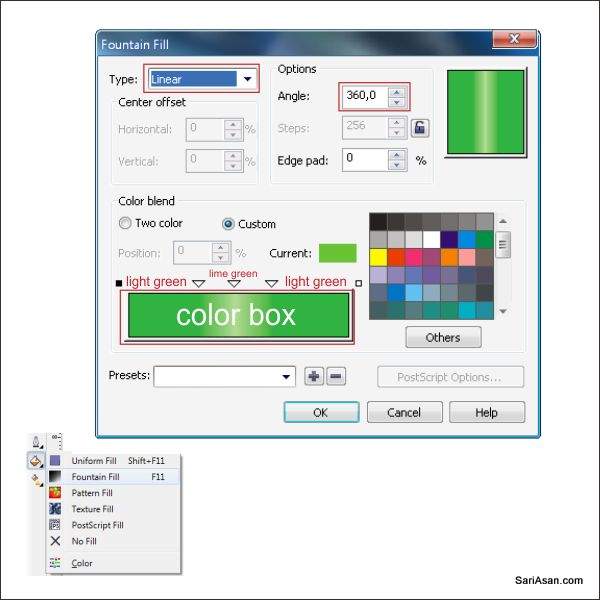

چهارمین رنگین کمان را انتخاب کنید ،به fountain fill toolبرویدومقدار زیر را اعمال کنید.


آخرین رنگین کمان را انتخاب کنیدبه fountain fill toolبرویدومقدار زیر را اعمال کنید.
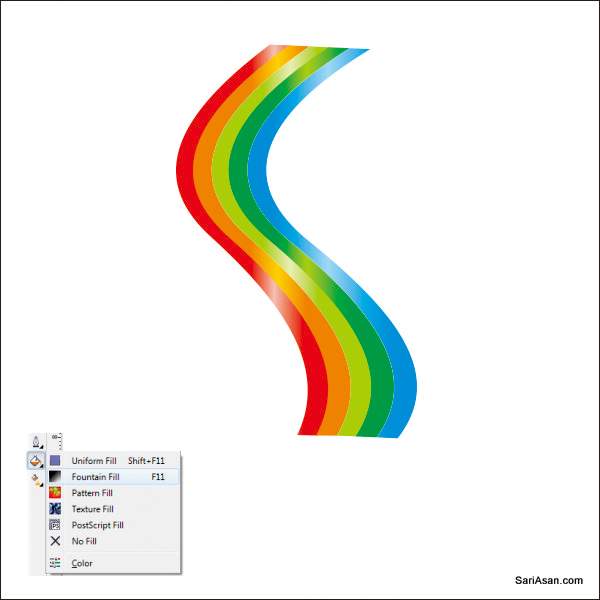
حالا همه رنگین کمان را انتخاب کنیدو آنرا در بالای پوستر تنظیم کنید.
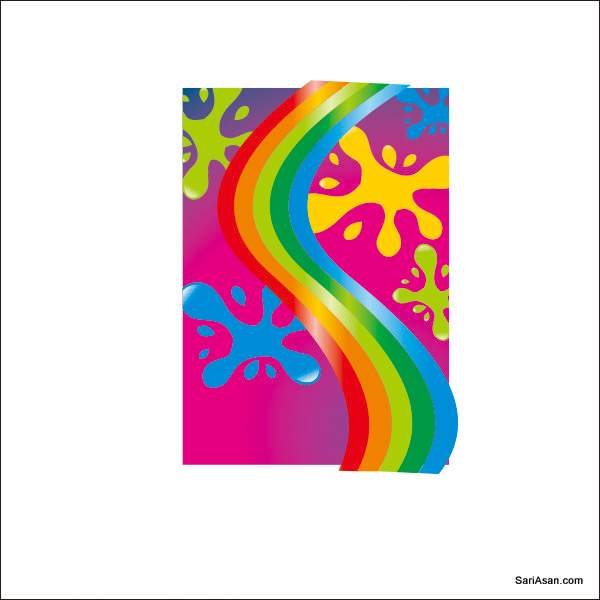
پس از آن در داخل بدن پوستر با استفاده از pover clip toolمانند مرحله ۶ محل رنگین کمان را انتخاب کنید.

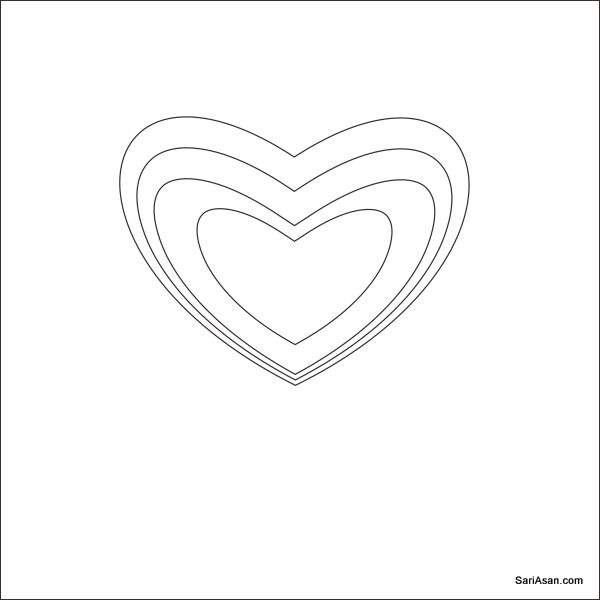
ماقصد داریم شکل قلب را با استفاده ازابزار bezierایجاد کنیم.با استفاده از ابزار bezierیک خط ایجاد کنید،
یک نقطه آنرا کلیک کنیدوشکل آنرا با استفاده ازشکل ابزار مانند مرحله ۴ ایجاد کنید.
شکل آن به شکل قلب شبیه است.با کشیدن موشواره به سمت راست لنزها را لمس وکپی کنید.
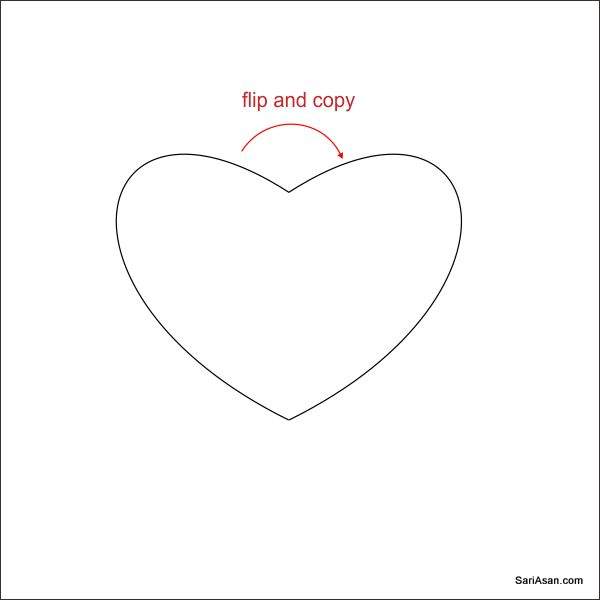
برای ترکیب آن ctrl+lرا فشار دهید وبه شکل ابزار بروید.دو گره را در بالای شکل قلب انتخاب کنید وبه نوار ابزار upperبروید.اگر گره ها پیوند نداشته باشند نمیتوانید رنگ آن را وارد کنید.

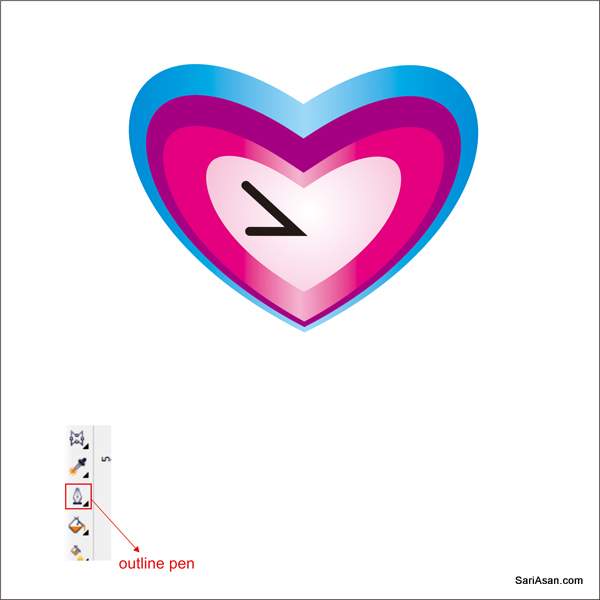
حالا که ما قلبمان را داریم میتوانیم آن را رنگ کنیم.قلب اول را انتخاب کنید وبه fountain fill toolبرویدومقدار زیر را اعمال کنید.
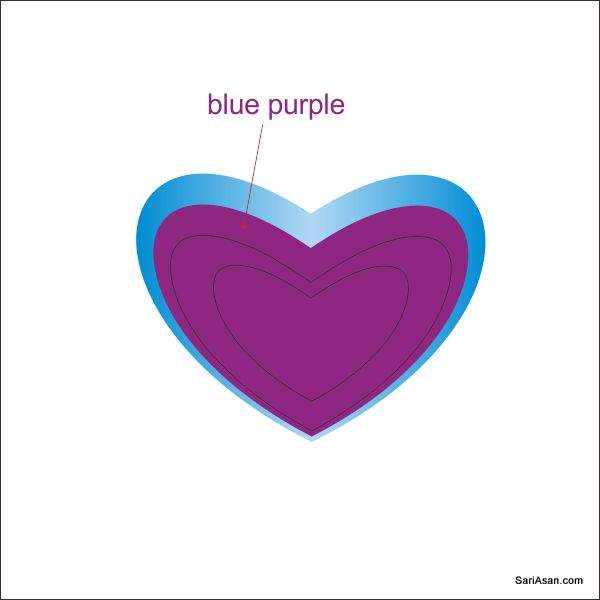
قلب دوم را انتخاب کنید وآنرا با رنگ بنفش آبی پر کنید.
قلب سوم راانتخاب کنیدوبه ابزار fountain fill toolبروید ومقدار زیر را اعمال کنید.
آخرین قلب را اتنخاب کنیدوبه fountain fill toolبرویدومقدارزیر را اعمال کنید.

حالا ما قصد داریم چشمان شکل قلب را با استفاده از ابزار bezierبکشیم.به Bezier toolبرویدویک شکل مثلث ایجاد کنید

بعد از آن به tooll option برویدومقدار زیر را اعمال کنیدوچشم را تکرار کنید ورنگ صورتی آنرا وارد کنید.

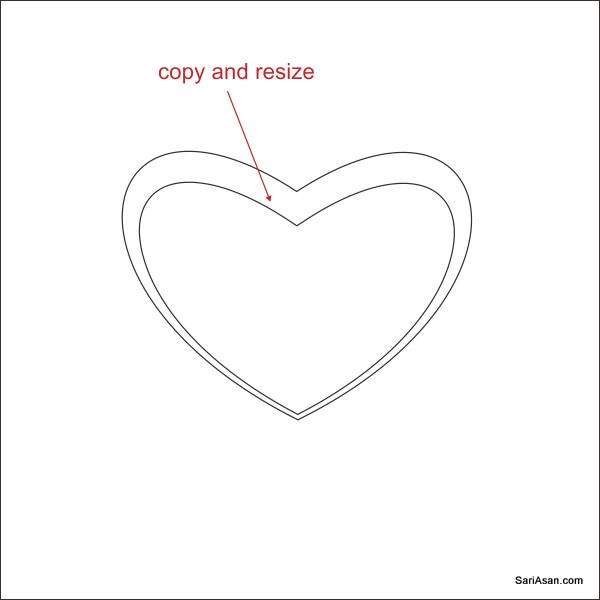
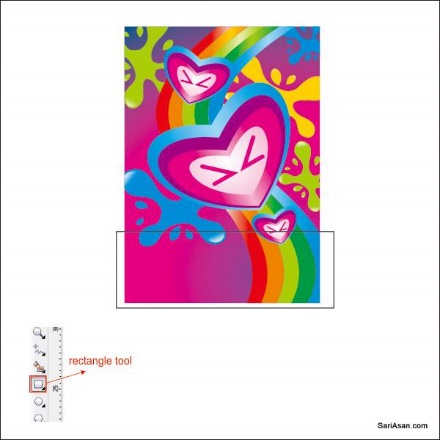
حالا که شکل قلب را داریم میخواهیم به آن ترتیب بدهیم.شکل قلب را انتخاب کنید آن را کپی کنیدومانند تصویر زیر تغییر دهید.

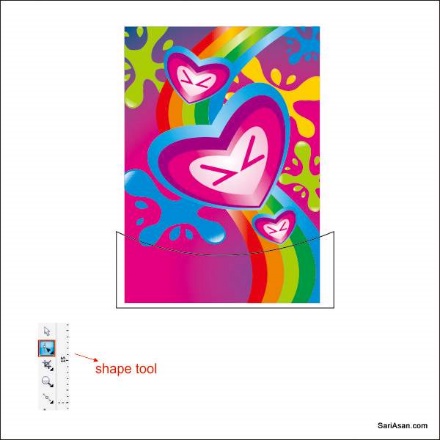
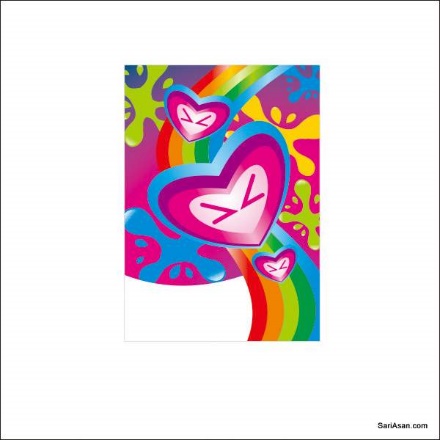
آنرا در بالای پوستر قرار دهید.شکل آنرا با استفاده از شکل ابزار در پوستر قرار دهید.
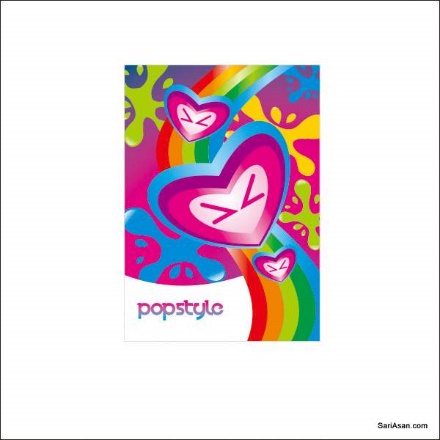
حالا اجازه دهید برخی از متن را در پوستر قرار دهید.بهtext tool بروید،در این آموزش از فونت velocity استفاده میکنیم،اما میتوانید آن را به هر چیزی که می خواهید تغییر دهید .هرمتنی را که میخواهید تایپ کنید آنرا در قسمت سفید پوستر قرار دهید.به fountain fill tool بروید و مقدار زیر را اعمال کنید.

تمرین شماره 4 برای کلاس